Setting Up Open WebUI: A Local ChatGPT Alternative

Running AI models locally gives you complete control, privacy, and zero dependency on internet connectivity. This guide walks you through setting up Open WebUI with Ollama—a ChatGPT-like interface running entirely on your machine.

What You’ll Need

  • Docker Desktop
  • Ollama (local LLM runtime)
  • About 15 minutes
  • At least 8GB of free disk space for models

Understanding the Architecture

Before we dive in, here’s how the components work together:

Collapsible Architecture Diagram
📊 View Architecture Diagram
User Interface Layer
🌐 Web Browser
Access at localhost:3000 – ChatGPT-like interface
Application Layer
🐳 Docker Desktop
Containerization platform running Open WebUI
Container: Open WebUI (port 3000:8080)
host.docker.internal
AI Runtime Layer
🦙 Ollama
Runs AI models locally – handles inference requests
Installed on host machine (not in container)
loads model →
Storage Layer
💾 Hard Drive
AI models stored locally (4-7GB per model)
📁 Docker Volume
Chat history & user data
⚡ GPU Acceleration (CUDA/Metal/ROCm)
Hardware Layer
🎮 GPU (Graphics Card)
Ollama offloads tensor operations here – 10-100x faster than CPU
NVIDIA (CUDA) | Apple Silicon (Metal) | AMD (ROCm)
🖥️ CPU (Fallback)
Used if no GPU available – slower but works

The Flow:

  1. You interact with Open WebUI in your browser (the polished ChatGPT-like interface)
  2. Open WebUI runs inside Docker Desktop (handles all dependencies automatically)
  3. Docker communicates with Ollama running on your host machine (the AI engine)
  4. Ollama loads models from your hard drive and processes them using your GPU for speed

Why not just use Ollama’s built-in interface? Ollama does have a simple command-line interface and basic web UI, but it’s minimal—think of it as the engine without the dashboard. Open WebUI provides the full-featured experience: conversation history, document uploads, model switching, multi-user support, and more.

Step 1: Install Docker Desktop

Docker provides the containerized environment for Open WebUI.

  1. Download Docker Desktop: https://docs.docker.com/desktop/
  2. Install and launch the application
  3. Verify installation by opening a terminal and running: docker --version

Step 2: Install Ollama

Ollama runs the AI models locally on your machine.

  1. Download Ollama: https://ollama.com/download
  2. Install for your operating system
  3. Verify installation: ollama --version

Step 3: Download an AI Model (Critical Step!)

You must download at least one model before launching Open WebUI. Without a model, Open WebUI will have nothing to talk to.

Download a model using Ollama:

ollama pull llama3.2

This downloads the Llama 3.2 model (about 4-7GB depending on the variant). Other popular options:

  • ollama pull llama3.2:1b (smaller, faster, less capable)
  • ollama pull mistral (alternative model)
  • ollama pull codellama (optimized for coding)

You can download multiple models and switch between them in Open WebUI.

Step 4: Launch Open WebUI

Run this single command to start Open WebUI:

docker run -d -p 3000:8080 \
  --add-host=host.docker.internal:host-gateway \
  -v open-webui:/app/backend/data \
  --name open-webui \
  --restart always \
  ghcr.io/open-webui/open-webui:main

What this does:

  • -p 3000:8080 – Maps port 3000 on your machine to the container
  • --add-host=host.docker.internal:host-gateway – Enables communication with Ollama on your host machine
  • -v open-webui:/app/backend/data – Creates a persistent Docker volume for your data
  • --restart always – Automatically restarts the container if it stops

Where is my data stored? Open WebUI stores all your conversations, settings, and uploaded documents in a Docker volume called open-webui. This data persists across:

  • Container restarts and updates
  • Docker Desktop restarts
  • Computer restarts

Your data is safe as long as you don’t delete the Docker volume itself. To find the exact location:

docker volume inspect open-webui

On most systems, Docker volumes are stored in:

  • Mac: ~/Library/Containers/com.docker.docker/Data/vms/0/
  • Windows: \\wsl$\docker-desktop-data\data\docker\volumes\
  • Linux: /var/lib/docker/volumes/open-webui/

Step 5: Access Your Interface

Open your browser and navigate to:

http://localhost:3000

Create an account (stored locally in the Docker volume) and start chatting with your AI models. You’ll see your downloaded Ollama models available in the model selector.

Why This Setup?

For Program Managers:

  • No vendor lock-in: Full control over your AI infrastructure
  • Data privacy: Everything stays on your machine—conversations, documents, all of it
  • Cost predictable: No usage-based pricing
  • Offline capable: Works without internet after initial setup
  • Customizable: Add models and adjust configurations as needed
  • Full-featured UI: Unlike Ollama’s basic interface, Open WebUI offers document uploads, conversation management, and team collaboration features

GPU Acceleration

Ollama automatically detects and uses your GPU if available:

  • NVIDIA GPUs: Uses CUDA (10-100x faster than CPU)
  • Apple Silicon: Uses Metal acceleration
  • AMD GPUs: Uses ROCm

You’ll see dramatically faster response times with GPU acceleration. Check Ollama’s logs to confirm GPU usage:

ollama serve

Troubleshooting

“No models available” in Open WebUI? You forgot to download a model! Run ollama pull llama3.2 and refresh Open WebUI.

Can’t connect to Ollama? Ensure Ollama is running. On most systems it runs automatically, but you can start it manually with ollama serve.

Port 3000 already in use? Change -p 3000:8080 to -p 3001:8080 (or any available port) and access at localhost:3001.

Container won’t start? Check Docker Desktop is running and you have sufficient disk space.

Want to back up your conversations? Export the Docker volume: docker run --rm -v open-webui:/data -v $(pwd):/backup ubuntu tar czf /backup/open-webui-backup.tar.gz /data


This setup provides a production-ready local AI assistant in under 15 minutes—no cloud dependencies required.

Angel Investing in 2025: Platforms, Organizations, and Building Your Investment Strategy

Understanding the Basics: Accredited vs. Non-Accredited Investors

Before diving into angel investing opportunities, it’s important to understand who can legally participate. The image you’ve shared illustrates the key requirements for accredited investors in the US and Canada.

In the US, accredited investors must meet one of these financial thresholds:

  • $200,000 annual income individually
  • $300,000 combined income with a spouse
  • $1,000,000 in financial assets (excluding primary residence)

Alternatively, certain qualifications like holding Series 7, 65, or 82 licenses or working for Venture Capital /Private Equity funds as “deemed knowledgeable” can qualify you.

Canada offers some different paths, including:

  • Self-certification as a knowledgeable investor
  • Participation in pilot programs in Alberta, Saskatchewan, and Ontario
  • Annual investment limits ($30k total, $10k per company)

These requirements exist because angel investing carries significant risks that regulators believe should be limited to those who can afford potential losses.

Where to Find Angel Investment Opportunities

Investment Platforms

For both accredited and (in some cases) non-accredited investors, several platforms have democratized access to startup investments:

  1. StartEngine – Equity crowdfunding platform allowing investments in early-stage companies
  2. AngelList – Provides access to startup investments and syndicates led by experienced investors
  3. FrontFundr – Canada’s leading equity crowdfunding platform connecting ventures with investors

Investment Syndicates

Joining an investment group can provide deal flow, due diligence support, and learning opportunities. Here are a few that I am a part of:

  1. Black Angels Group – Focused on supporting Black founders and diverse teams
  2. 1891 Angels – Emphasizing investments within the Johns Hopkins Alumni Network
  3. Gaingels – LGBTQ+-led investment syndicate supporting diversity in entrepreneurship

Venture Capital Firms

While traditional VC firms primarily work with institutional investors, some offer opportunities for angel participation:

  1. Sequoia Capital – Legendary firm with occasional opportunities for angels to co-invest
  2. BAG Ventures – Working with qualified angels on select deals

The Importance of Developing an Investment Thesis

Creating a macro thesis for your angel investments isn’t just helpful—it’s essential for success. A well-defined thesis helps you:

  1. Focus on your knowledge areas – Investing in industries you understand improves your ability to evaluate opportunities
  2. Maintain discipline – A thesis prevents the “shiny object syndrome” of chasing trendy deals
  3. Build pattern recognition – Concentrating on specific sectors helps you spot winners and avoid pitfalls
  4. Create a cohesive portfolio – Related investments can provide synergies and cross-learning

Your thesis might focus on industry (fintech, healthcare), business model (SaaS, marketplace), geography, founder characteristics, or a combination of factors.

Resources for Angel Investing Education

Before making significant investments, educating yourself is crucial. Several resources can help:

  1. Class Rebel – Their “Angel Investing 101” course offers comprehensive guidance for beginners
  2. Books – “Angel Investing” by David S. Rose and “Venture Deals” by Brad Feld provide valuable insights

Streamlining Your Investment Process with Luminant

Managing angel investments becomes increasingly complex as your portfolio grows. Luminant helps investors:

  1. Screen potential deals efficiently against your criteria
  2. Track portfolio performance across investments
  3. Manage documents and cap tables in one place
  4. Connect with other investors for co-investment opportunities

If you’re interested in trying Luminant sign up here

Conclusion

Angel investing can be both financially rewarding and personally fulfilling, allowing you to support innovation while potentially generating returns. By understanding the legal requirements, focusing on opportunities aligned with your thesis, continuing your education, and using the right tools, you can build a strategic approach to angel investing in 2025 and beyond.

Standup at Standup!

These are one of those comments that sound like a joke but every joke has some truth behind it!

Hopefully your standup is working perfectly. But if it feels like dragging along for longer than 15 mins AND everyone is sitting down. GET UP! In my experience, giving updates while standing has been shown to dramatically shorten the total time to conduct standup

Martin Fowler and collaborators have written the best article I have read with regards in how to conduct standup. Check that out here

Getting Started with Cloud Development

I started working as a Release Engineer roughly 3 years ago and I knew NOTHING about containers, cloud security, docker, kubernetes, patterns, tools, etc… As a release eng, I was responsible for building, packaging, and troubleshooting a few of VMware’s multi-cloud kubernetes offerings (e.g Piovtal Container Service). Before I could be useful with any of that, I needed to understand the building blocks

The following resources were useful at the beginning of my journey

Videos on Containers

Benefits of Containers https://www.youtube.com/watch?v=cCTLjAdI
Qho
Docker Tutorialhttps://www.linkedin.com/learning/learning- docker-2/why-create-containers-using-docker

https://www.linkedin.com/learning/learning-docker-17236240
Docker Networking Optionshttps://www.youtube.com/watch?v=Yr6-2ddhLVo
Containers vs VMshttps://www.youtube.com/watch?v=L1ie8neg
Cjc
Containers 101https://www.youtube.com/watch?v=VqLcWftIa
QI

SSL / TLS / CA Certs

Asymmetric encryption explainedhttps://www.youtube.com/watch?v=AQDCe58
5Lnc
How does HTTPS work? What’s a CA? What’s a self-signed Certificate?https://www.youtube.com/watch?v=T4Df5_coj
As
Certificates with Kuberneteshttps://www.youtube.com/watch?v=gXz4cq3P
Kdg

Kubernetes videos and tutorials

The Illustrated guide to Kuberneteshttps://www.youtube.com/watch?v=4ht22ReBjno
Understanding Kubernetes 1https://www.youtube.com/watch?v=CuWSY_f
wV6M
Understanding Kubernetes 2https://www.youtube.com/watch?v=E3ExWruj
i7g
Understanding Kubernetes 3https://www.youtube.com/watch?v=BrtvGHwy
za0
Commonly asked questions https://www.youtube.com/watch?v=3PLq2vTIj
VE
What happens when…https://github.com/jamiehannaford/what-
happens-when-k8s#kubectl
Kubernetes the hard wayhttps://github.com/kelseyhightower/kubernete
s-the-hard-way

Certified Kubernetes Application Developer Exam Prep

Took and passed the CKAD exam a few weeks ago. Here are some things that helped me

Study Guide

Certified Kubernetes Application Developer Udemy Course: is a must take for CKAD prep. Purchase on the holiday to get a discount. DO the mock exams. DO lightning labs

CKAD Exercises – This helped build muscle memory for the various kubernetes commands. Especially helpful for kubernetes beginners

Killer.sh – Simulates an exam that is pretty close to the real thing. It is difficult on purpose. If these exercise don’t feel difficult, you should be able to pass the exam easily.

Signing up for the exam

This is the link for the exam. Purchase on the holiday as well to get a steep discount

Pro tip: Schedule your exam as soon as possible to secure a spot. You can schedule well into the future!

During the Exam

Show up at least 20 minutes early for the exam. Make sure your exams space is CLEAR of notes and any obstructions. Your virtual exam proctor will have to use your webcam to verify. This process can take a long time!

The Kubernetes documentation will be your friend and available (via one tab) during the exam. Navigate them quickly using the search bar. Grep through docs using Ctrl+F / Command + F for relevant portions

Example: If you’re looking for an example pod yaml for a persistent volume claim setup, go to the relevant page and search for “kind: Pod” to find the yaml setup

Helpful Aliases

alias kd= kubectl describe # example usage: kd pod x

alias kns='kubectl config set-context --current --namespace ' # example usage: kns default

export do="--dry-run=client -o yaml" # example usage: k get pod x $do

VIM

I used my vim as my editor of choice. I use the following techniques to move faster with file manipulation

Duplicate sections of yml using yank and paste

Delete sections of code using dd # example usage to delete next 4 lines: 4dd

Here is my ~/.vimrc which I created at the beginning of the test

set tabstop=2
set expand-tab
set shiftwidth=2

With these presets, you can copy and paste sections from the web and align them within the yaml properly (with extra manual formatting)

Use Github Templates for starter code!

Background

Ever wanted to start a project with a tech stack that you are familiar with? One that you have already customized with preferred dependencies and defaults? Github allows users to create projects as templates. These templates can be used to generate other projects with code from the template.

For an example, when I create react applications I know I want to always start out with typescript, jest, react testing library, and certain directory structures.

Steps

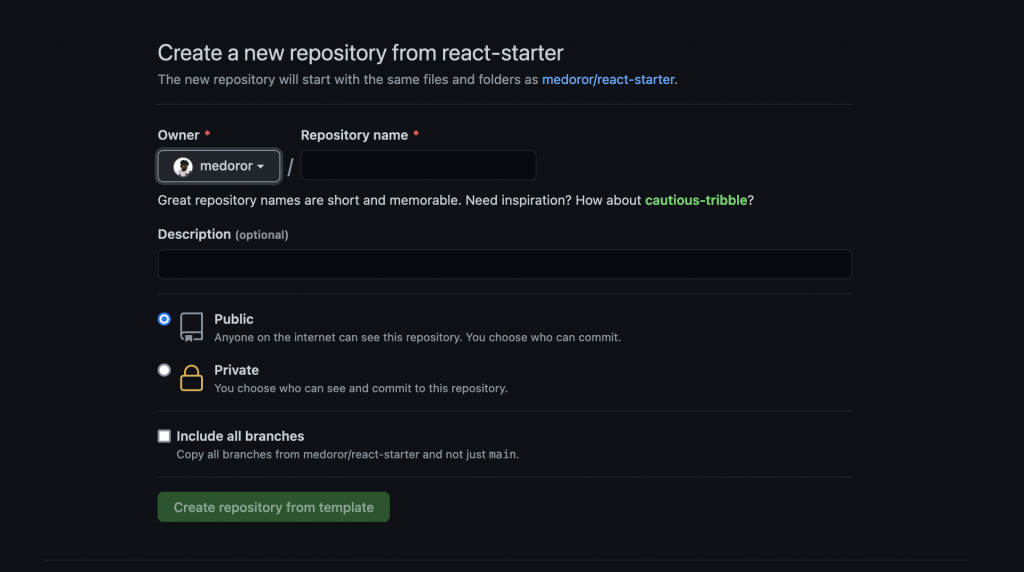
I created a react-starter project. Then went to Settings > Template Repository to convert that project to a template

Next, I created the my other project using the Use this template button in the react-starter template repository

Now it’s time to configure your new project as normal

New projects created from templates should have a reference to the template under the name of the project

And that’s it! The current repository does not have too many defaults right now but nothing is stopping me from continuing to add more down the line

CS for Kids

Book and game recommendations for younger children to get into programming! Leave your recommendations in the comments!

TypeNameAge Range
BookHello Ruby
BookIf Ball; Then Catch5 – 8
BookRosie Technology Book
BookABC Technology Book
BookHow to Code a Rollercoaster4 – 8
BookWebster’s Email3 – 8
BookCounting on Katherine: How Katherine Johnson Save Apollo 135 – 9
BookGrace Hopper: Queen of Computer Code 5 and UP
BookThe Technology Tail: A Digital Footprint Story7 – 10
BookHow to Code a Sandcastle 4 – 8
BookSecret Coders (Series)8 – 12
BookAda Twist, Scientist (The Questioneers)5 -7
BookComputational Fairy Tales8 – 12
BookAda Lovelace: Poet of Science
GameTuring Tumble8 and UP
GameLightbot6 and UP
GameScratch Jr5 – 7
GameCode.org4 – 13
GameCode Combat
GameRobot TurtlesAges: 4 and UP

Serverless Framework Gotmes

Installing binaries within AWS lambda using layers

My bot uses ffmpeg to produce the audio clips. In a serverless environment, I needed to make sure that my lambda had access to the ffmpeg program on disk to run my lambda function AWS lambda provides a way to use binaries using aws layers. The layer concept allows developers to install programs in the serverless environment to be used by your lambda program. The serverless framework provides an interface to use layers via serverless.yml. More documentation on layers here

Serverless upload size

An error occurred: AppLambdaFunction - Unzipped size must be smaller than 185965792 bytes

AWS has a hard limit for the unzipped size of your lambda function. What helped me trim my deployment:

  • Remove all serverless plugins upon uploading your program. Alternatively, a plugin can help reduce node lambda deployments. See the serverless webpack plugin for more information
  • Make sure to only package required development dependencies
  • Trim down packages installed within your layers. For an example, ffmpeg comes with docs, libs, and binaries that were not necessary.

Debugging deployments

Development logs from within the UI seemed to truncate 90% of the information. Tailing the logs was the best way for me to debug my deployed application.

serverless logs -f <application-name> -t

Audio Clipper and the Serverless Slackbot

Motivations

My friends and I communicate daily over slack. Our channels are full of the usual jokes, inappropriate convos, gifs, that most groupchats are filled with. Instead of pictures, gifs, or videos, I wanted to be able to react to conversations using an audio clip.

I didn’t really see a way to do this. I got close by finding a youtube clip with the audio. Unfortunately, that youtube link came with video and a commercial.

Continue reading